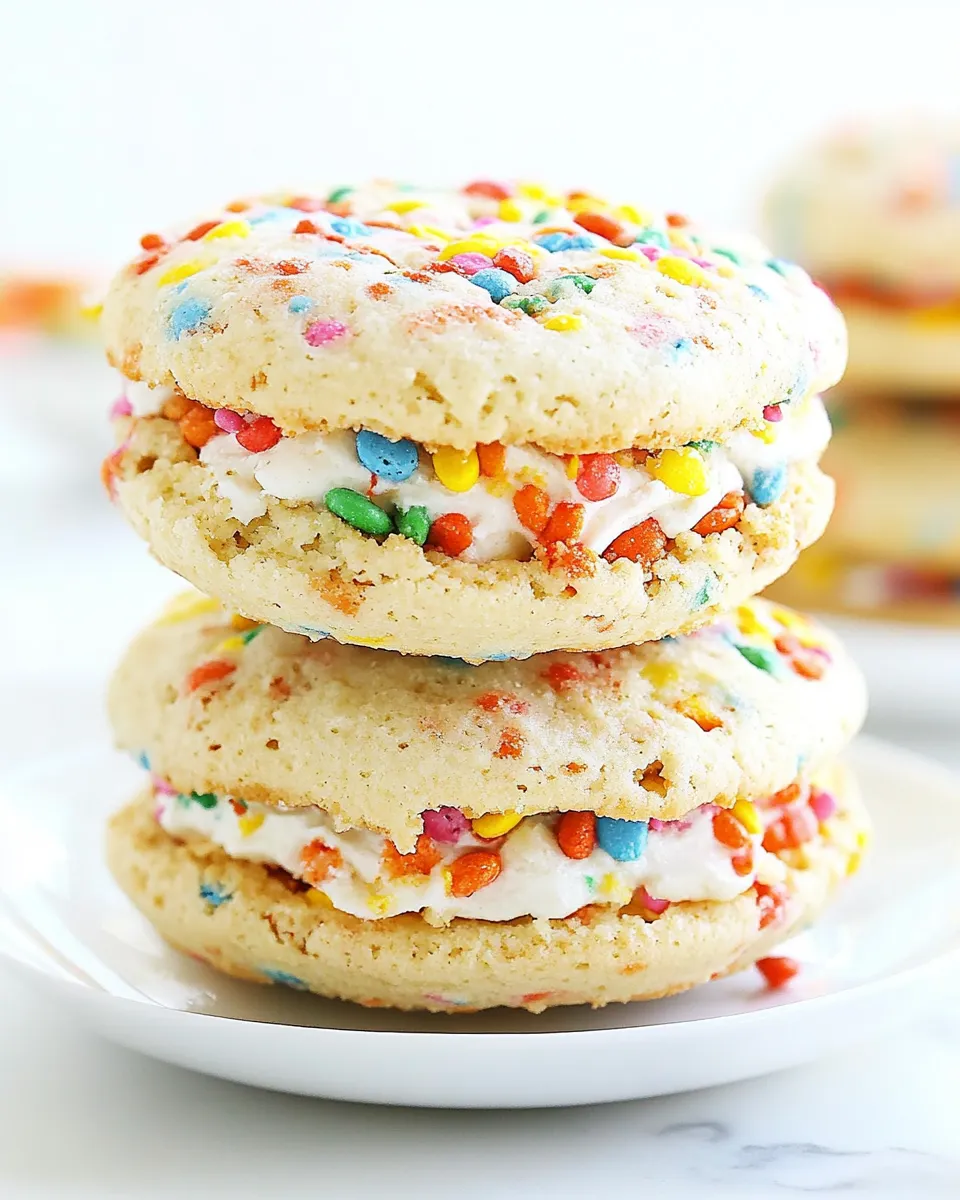
Fruity Pebbles Whoopie Pies
If you’re on the hunt for a nostalgic yet playful dessert that brings out your inner child, you’ve come to the right place! Fruity Pebbles Whoopie Pies are not just a treat; they are a vibrant explosion of color and flavor, guaranteed to brighten anyone’s day. These delightful desserts consist of two soft, cake-like cookies filled with a fluffy marshmallow cream, all with the iconic flavor of Fruity Pebbles cereal. Whether you’re hosting a party or just indulging in a sweet treat at home, these whoopie pies are sure to impress.
Why You’ll Love This Recipe
Fruity Pebbles Whoopie Pies are perfect for any occasion. They are:
- Colorful and Fun: Brighten up your dessert table with these eye-catching treats.
- Easy to Make: With simple ingredients and straightforward steps, baking these pies is a breeze.
- Versatile: Enjoy them as a sweet snack, dessert at gatherings, or even as a unique birthday treat.
- Deliciously Nostalgic: The familiar taste of Fruity Pebbles cereal takes you back to your childhood.
What You’ll Gather
To create these scrumptious Fruity Pebbles Whoopie Pies, you will need the following ingredients:
- 1 cup butter flavored shortening
- 1 cup granulated sugar
- 1 egg
- 2 teaspoons vanilla extract
- 1 cup buttermilk
- 1 cup hot water
- 2 cups all-purpose flour
- 1 teaspoon baking soda
- 1/2 teaspoon salt
- 1 cup Fruity Pebbles, slightly crushed
- 1/2 cup unsalted butter, room temperature
- 1 cup powdered sugar, sifted
- 2 teaspoons vanilla extract
- 1 (7-ounce) container marshmallow cream
- 1/2 cup Fruity Pebbles, slightly crushed (for filling)
Cook’s Kit
Before you start baking, make sure you have the following tools:
- Mixing Bowls: For combining wet and dry ingredients.
- Hand Mixer or Stand Mixer: To create a light and fluffy filling.
- Baking Sheets: To bake your whoopie pies.
- Parchment Paper: To prevent sticking and for easy cleanup.
- Cookie Scoop or Spoon: For portioning the dough evenly.
- Cooling Rack: To cool your whoopie pies after baking.
From Start to Finish: Fruity Pebbles Whoopie Pies

Step 1: Preheat the Oven
Start by preheating your oven to 350°F (175°C). This ensures that your whoopie pies bake evenly and rise beautifully.
Step 2: Prepare the Cookie Batter
In a large bowl, combine the butter flavored shortening and granulated sugar. Use a mixer to cream them together until the mixture is light and fluffy. Next, add the egg and 2 teaspoons of vanilla extract, mixing well until fully incorporated.
Step 3: Add Buttermilk and Hot Water
Gradually stir in the buttermilk. Then, carefully mix in the hot water, ensuring that the batter remains smooth and well combined.
Step 4: Combine Dry Ingredients
In another bowl, whisk together the all-purpose flour, baking soda, and salt. Gradually add the dry mixture to the wet ingredients, mixing until just combined. Be careful not to overmix, as this can lead to dense cookies.
Step 5: Fold in Fruity Pebbles
Gently fold in 1 cup of slightly crushed Fruity Pebbles into the batter, allowing their vibrant colors to blend throughout the dough.
Step 6: Scoop and Bake
Using a cookie scoop or a spoon, drop rounded tablespoons of the batter onto parchment-lined baking sheets, leaving space between each cookie. Bake for about 10-12 minutes or until the edges are lightly golden and the centers are set.
Step 7: Cool the Cookies
Once baked, remove the cookies from the oven and let them cool on the baking sheet for a few minutes before transferring them to a cooling rack to cool completely.
Step 8: Make the Filling
While the cookies are cooling, prepare the marshmallow filling. In a mixing bowl, beat together the room temperature unsalted butter, sifted powdered sugar, 2 teaspoons of vanilla extract, and marshmallow cream until smooth and fluffy. Finally, fold in 1/2 cup of slightly crushed Fruity Pebbles to give your filling that extra crunch and flavor!
Step 9: Assemble the Whoopie Pies
Take one cookie and spread a generous amount of the marshmallow filling on the flat side. Top it off with another cookie, pressing down gently to create a sandwich. Repeat this process until all cookies are filled.
Step 10: Enjoy!
Your Fruity Pebbles Whoopie Pies are ready to be enjoyed! Serve them immediately or allow them to chill in the fridge for a bit for a firmer filling.
Seasonal Twists

Looking to jazz up your Fruity Pebbles Whoopie Pies for different occasions? Consider these seasonal twists:
- Spring: Add a teaspoon of orange or lemon zest to the filling for a refreshing citrus note.
- Summer: Incorporate a layer of fresh fruit, like strawberries or raspberries, into the filling.
- Fall: Substitute some of the buttermilk with apple cider for a seasonal flavor.
- Winter: Add a sprinkle of ground cinnamon or nutmeg to the cookie batter for a warm spice note.
Avoid These Traps
To ensure your Fruity Pebbles Whoopie Pies turn out perfectly, keep these tips in mind:
- Don’t Overmix: Overmixing can lead to tough cookies. Mix until just combined.
- Watch the Baking Time: Every oven is different. Keep an eye on your cookies to prevent overbaking.
- Use Room Temperature Ingredients: Make sure your butter and eggs are at room temperature for a smooth batter.
- Don’t Skip the Cooling: Allow cookies to cool completely before filling to avoid melting the filling.
Storing, Freezing & Reheating
To keep your Fruity Pebbles Whoopie Pies fresh:
Store them in an airtight container at room temperature for up to 3 days. For longer storage, you can freeze the assembled whoopie pies. Wrap each one individually in plastic wrap, then place them in a freezer-safe bag or container. They will last in the freezer for up to 2 months. When you’re ready to enjoy them, simply thaw them at room temperature.
Handy Q&A
Can I use regular butter instead of butter flavored shortening?
Yes, you can use regular unsalted butter in place of butter flavored shortening. However, the texture and flavor may vary slightly.
What if I don’t have buttermilk?
If you don’t have buttermilk, you can make a quick substitute by adding 1 tablespoon of vinegar or lemon juice to a cup of milk. Let it sit for about 5 minutes to curdle.
Can I make mini whoopie pies?
Absolutely! Just use a smaller scoop for the batter and adjust the baking time to about 8-10 minutes.
How do I prevent the filling from oozing out?
Make sure your cookies are completely cooled before adding the filling. Additionally, don’t overfill them; a generous tablespoon of filling is usually just right.
In Closing
Fruity Pebbles Whoopie Pies are a delightful twist on a classic dessert that will bring a smile to anyone who takes a bite. The colorful cereal adds not just a fun, nostalgic flavor, but also a playful crunch that makes these pies irresistible. Whether you’re baking for a special occasion or simply indulging in a sweet treat, this recipe is sure to become a favorite in your household. So grab your ingredients, gather your kitchen tools, and get ready to whip up a batch of these colorful confections. Happy baking!

Fruity Pebbles Whoopie Pies
Ingredients
Equipment
Method
- Step 1: Preheat the Oven - Start by preheating your oven to 350°F (175°C) to ensure even baking.
- Step 2: Prepare the Cookie Batter - In a large bowl, combine the butter flavored shortening and granulated sugar. Cream until light and fluffy. Add the egg and 2 teaspoons of vanilla extract, mixing well.
- Step 3: Add Buttermilk and Hot Water - Gradually stir in the buttermilk and then mix in the hot water until smooth.
- Step 4: Combine Dry Ingredients - In another bowl, whisk together the flour, baking soda, and salt. Gradually add to the wet ingredients, mixing until just combined.
- Step 5: Fold in Fruity Pebbles - Gently fold in 1 cup of slightly crushed Fruity Pebbles into the batter.
- Step 6: Scoop and Bake - Drop rounded tablespoons of batter onto parchment-lined baking sheets, leaving space between each. Bake for 10-12 minutes until edges are golden.
- Step 7: Cool the Cookies - Allow cookies to cool on the baking sheet before transferring to a cooling rack.
- Step 8: Make the Filling - Beat together the room temperature butter, sifted powdered sugar, 2 teaspoons of vanilla extract, and marshmallow cream until smooth. Fold in 1/2 cup of crushed Fruity Pebbles.
- Step 9: Assemble the Whoopie Pies - Spread a generous amount of filling on the flat side of one cookie and top with another, pressing gently.
- Step 10: Enjoy! - Serve immediately or chill for a firmer filling.
Notes
- Store in an airtight container at room temperature for up to 3 days.
- Freeze assembled whoopie pies individually wrapped for up to 2 months.
- Use room temperature ingredients for a smoother batter.