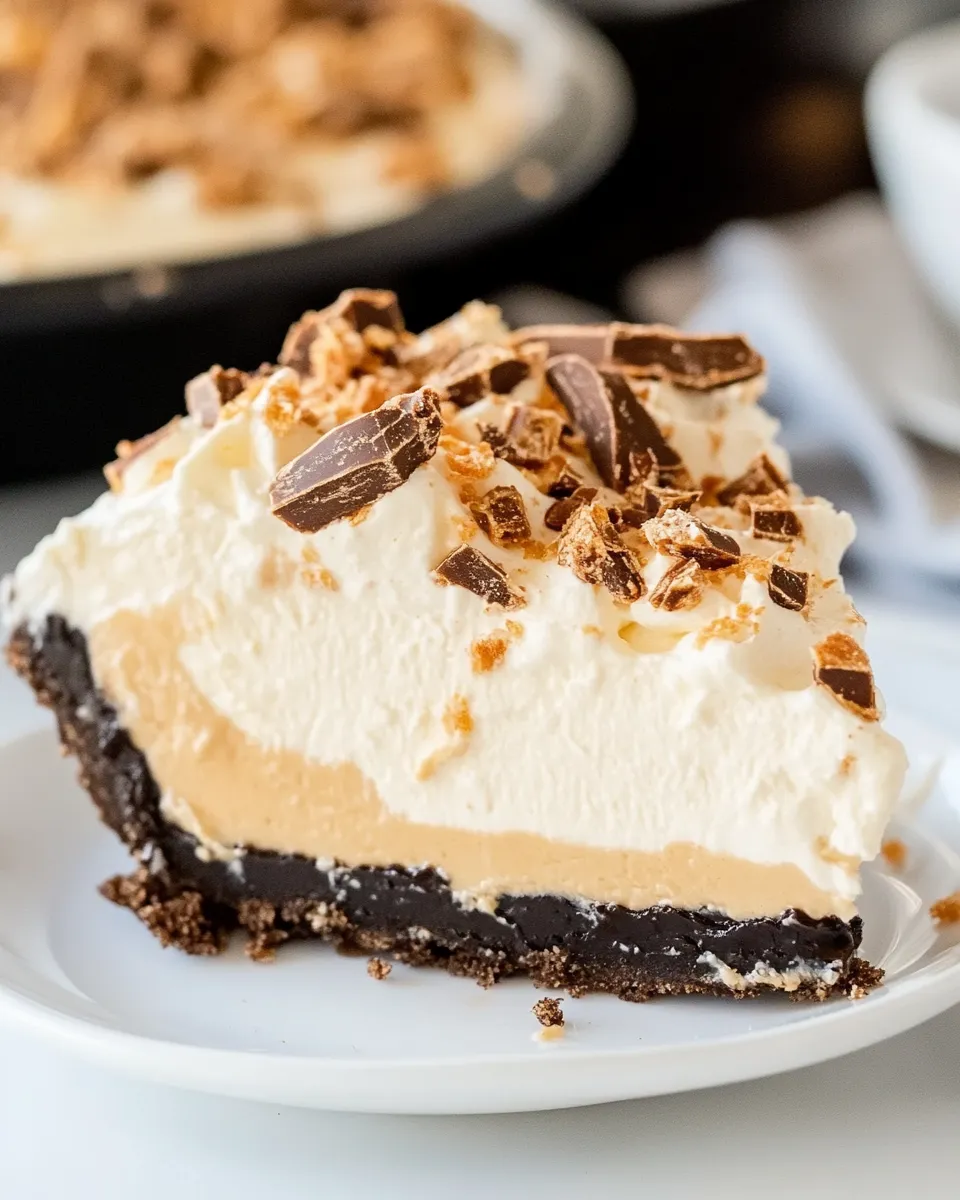
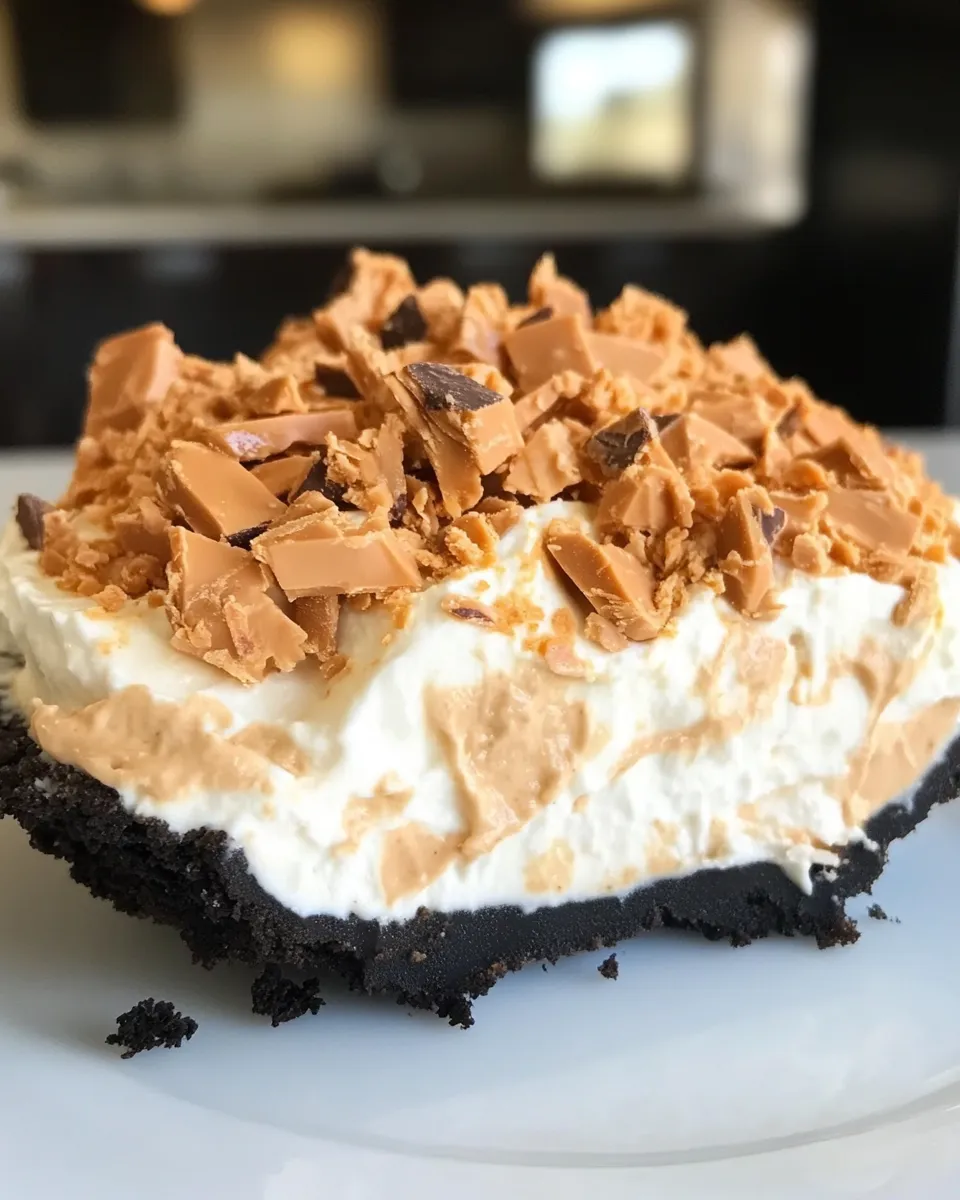
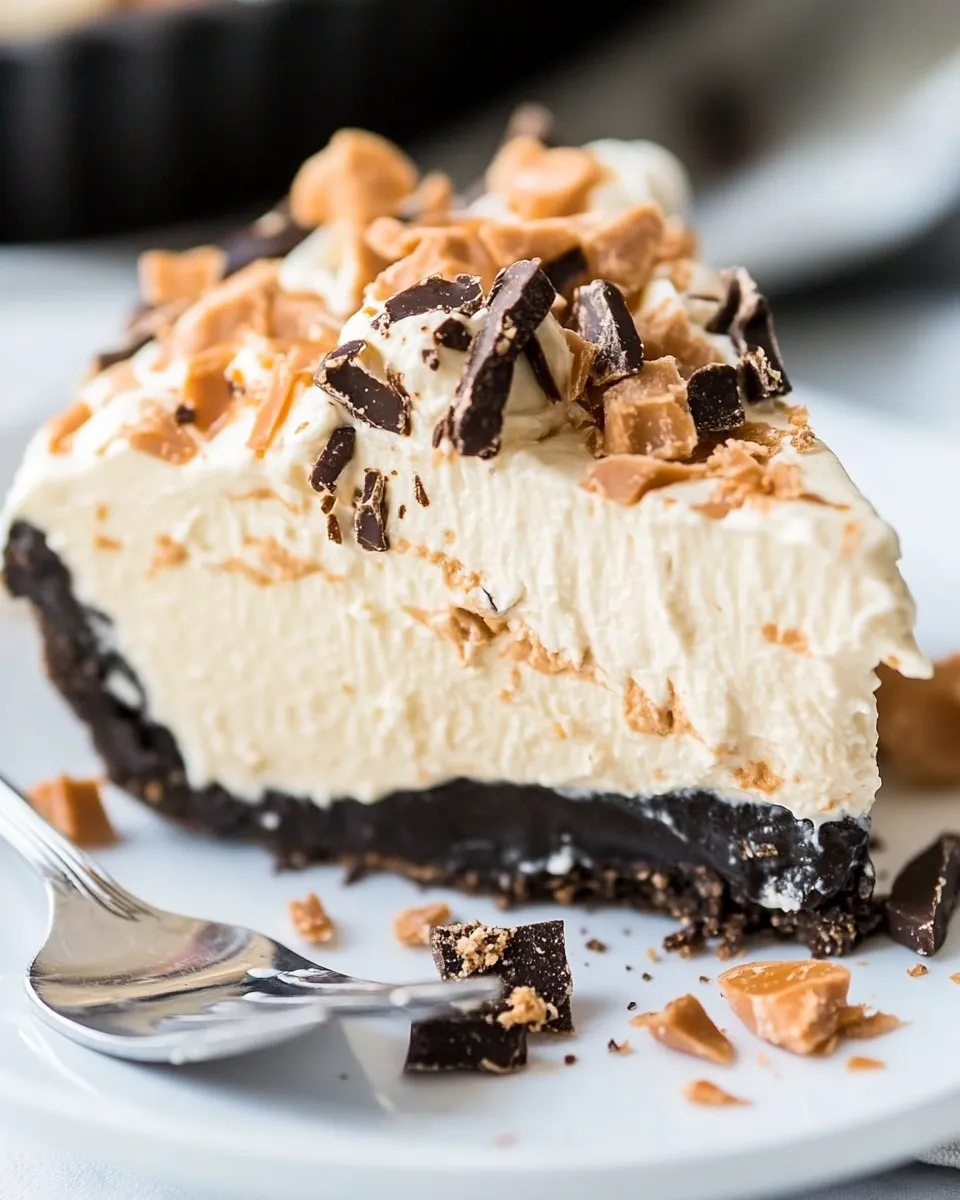
No-Bake Butterfinger Pie
Indulging in a slice of No-Bake Butterfinger Pie is like getting a sweet hug from your childhood candy bar dreams. This pie brings together the creamy richness of peanut butter, the delightful crunch of Butterfinger candy bars, and a luscious Cool Whip topping, all nestled in a buttery Oreo crust. The best part? You don’t even need to turn on the oven! Perfect for warm days or when you’re craving something sweet without the hassle of baking, this pie is sure to impress family and friends alike.
The Upside of No-Bake Butterfinger Pie
No-Bake Butterfinger Pie is the epitome of convenience and deliciousness. It requires minimal effort and ingredients, yet delivers maximum flavor. Whether you’re hosting a party, celebrating a birthday, or simply treating yourself, this pie is a crowd-pleaser that will have everyone coming back for seconds. Plus, the no-bake aspect means you can whip it up in no time and let it chill while you enjoy your day.
What Goes Into No-Bake Butterfinger Pie
To create this delightful dessert, you’ll need the following ingredients:
- 24 Oreo cookies, crushed into crumbs
- 3 tablespoons butter, melted and cooled
- 8 ounces (226.8g) cream cheese, at room temperature
- 1 cup (129g) creamy peanut butter
- 1/2 cup (50g) granulated sugar
- Pinch of salt
- 8 ounces (226.8g) Cool Whip
- 8 Fun Size Butterfinger candy bars, coarsely chopped
- 4 ounces (113.4g) Cool Whip, for topping
- Chocolate syrup, for drizzling
- 2 Fun Size Butterfinger candy bars, coarsely chopped, for garnish
Equipment & Tools
Before you get started, gather these tools to make the process smoother:
- Mixing bowl: For combining your ingredients.
- Electric mixer: To achieve that creamy, smooth filling.
- Pie dish: Your delicious creation will need a home!
- Rubber spatula: For folding in the Cool Whip and scraping the bowl clean.
- Measuring cups and spoons: Accuracy is key in baking.
- Plastic wrap: To cover your pie while it chills in the fridge.
No-Bake Butterfinger Pie — Do This Next
Now that you have everything ready, follow these simple steps to create your No-Bake Butterfinger Pie:
Step 1: Make the Oreo Crust
In a mixing bowl, combine the crushed Oreo cookies with melted butter. Stir until the crumbs are evenly coated. Press this mixture firmly into the bottom and up the sides of a 9-inch pie dish to form an even crust. Place the crust in the refrigerator to chill while you prepare the filling.
Step 2: Prepare the Peanut Butter Filling
In another mixing bowl, beat the cream cheese until smooth using an electric mixer. Add in the creamy peanut butter, granulated sugar, and a pinch of salt. Mix until well combined and creamy.
Step 3: Fold in the Cool Whip
Gently fold in the 8 ounces of Cool Whip into the peanut butter mixture. Be careful not to deflate the whipped cream; you want to keep that light and airy texture.
Step 4: Add the Butterfinger Candies
Stir in the chopped Fun Size Butterfinger candy bars, ensuring they are evenly distributed throughout the filling.
Step 5: Fill the Crust
Spoon the peanut butter filling into the chilled Oreo crust, smoothing the top with a spatula.
Step 6: Chill the Pie
Cover the pie with plastic wrap and refrigerate for at least 4 hours, or until firm. This allows the flavors to meld beautifully.
Step 7: Add the Topping
Once the pie is set, spread the remaining 4 ounces of Cool Whip over the top. Drizzle chocolate syrup generously and sprinkle the last 2 Fun Size Butterfinger candy bars on top for an extra touch of crunch and sweetness.
If You’re Out Of…

If you find yourself missing an ingredient, don’t worry! Here are some alternatives you can use:
- Oreo cookies: Use any chocolate sandwich cookie or graham crackers instead.
- Cream cheese: Mascarpone cheese can be a rich alternative.
- Creamy peanut butter: Crunchy peanut butter can add an interesting texture.
- Cool Whip: Homemade whipped cream can be used if you prefer a natural option.
Things That Go Wrong
While making No-Bake Butterfinger Pie is fairly straightforward, here are some common pitfalls to avoid:
- Not letting the crust chill: Skipping this step can lead to a crumbly crust that doesn’t hold together well.
- Overmixing the Cool Whip: This can cause your filling to become dense instead of light and fluffy.
- Using warm ingredients: Ensure your cream cheese is at room temperature to achieve a smooth filling.
- Not chilling long enough: Patience is key! A short chill time can affect the pie’s texture.
Cooling, Storing & Rewarming
Once your No-Bake Butterfinger Pie is prepared, it should be kept in the refrigerator. Here are some guidelines:
- Cooling: Allow the pie to chill for at least 4 hours for best results.
- Storing: Cover with plastic wrap and store in the fridge for up to 4 days.
- Rewarming: There’s no need to rewarm this pie; it’s meant to be served cold and refreshing.
Your Top Questions
Can I use a different type of candy instead of Butterfinger?
Absolutely! Feel free to experiment with other candy bars like Snickers or Reese’s for a different flavor twist.
Is it possible to make this pie vegan?
Yes, you can substitute dairy products with vegan alternatives, such as using vegan cream cheese and whipped topping. Just ensure the candy bars are also vegan-friendly.
Can I freeze No-Bake Butterfinger Pie?
Yes, you can freeze this pie! Just cover it tightly with plastic wrap and store it in the freezer for up to a month. Thaw in the refrigerator before serving.
What can I serve with No-Bake Butterfinger Pie?
This pie is delicious on its own, but you can elevate it with a scoop of vanilla ice cream or a dollop of fresh whipped cream.
Make It Tonight
It’s time to treat yourself to a delightful dessert that requires no baking at all! No-Bake Butterfinger Pie is an easy recipe that’s perfect for any occasion. With just a handful of ingredients and a little patience, you’ll create a dessert that’s creamy, crunchy, and utterly irresistible. So gather your ingredients, and let’s make some sweet memories tonight!
Whether you’re making it for a special event or simply to enjoy at home, this No-Bake Butterfinger Pie will quickly become a go-to recipe in your dessert repertoire. So, put on your favorite tunes, get comfortable in the kitchen, and enjoy the delicious process of making this fantastic pie!
No-Bake Butterfinger Pie
Ingredients
Equipment
Method
- Step 1: Make the Oreo Crust - In a mixing bowl, combine the crushed Oreo cookies with melted butter. Stir until the crumbs are evenly coated. Press this mixture firmly into the bottom and up the sides of a 9-inch pie dish to form an even crust. Place the crust in the refrigerator to chill while you prepare the filling.
- Step 2: Prepare the Peanut Butter Filling - In another mixing bowl, beat the cream cheese until smooth using an electric mixer. Add in the creamy peanut butter, granulated sugar, and a pinch of salt. Mix until well combined and creamy.
- Step 3: Fold in the Cool Whip - Gently fold in the 8 ounces of Cool Whip into the peanut butter mixture. Be careful not to deflate the whipped cream; you want to keep that light and airy texture.
- Step 4: Add the Butterfinger Candies - Stir in the chopped Fun Size Butterfinger candy bars, ensuring they are evenly distributed throughout the filling.
- Step 5: Fill the Crust - Spoon the peanut butter filling into the chilled Oreo crust, smoothing the top with a spatula.
- Step 6: Chill the Pie - Cover the pie with plastic wrap and refrigerate for at least 4 hours, or until firm. This allows the flavors to meld beautifully.
- Step 7: Add the Topping - Once the pie is set, spread the remaining 4 ounces of Cool Whip over the top. Drizzle chocolate syrup generously and sprinkle the last 2 Fun Size Butterfinger candy bars on top for an extra touch of crunch and sweetness.
Notes
- For a different flavor, substitute Butterfinger with Snickers or Reese’s.
- Ensure the cream cheese is at room temperature for a smooth filling.
- Cover the pie with plastic wrap while chilling to keep it fresh.