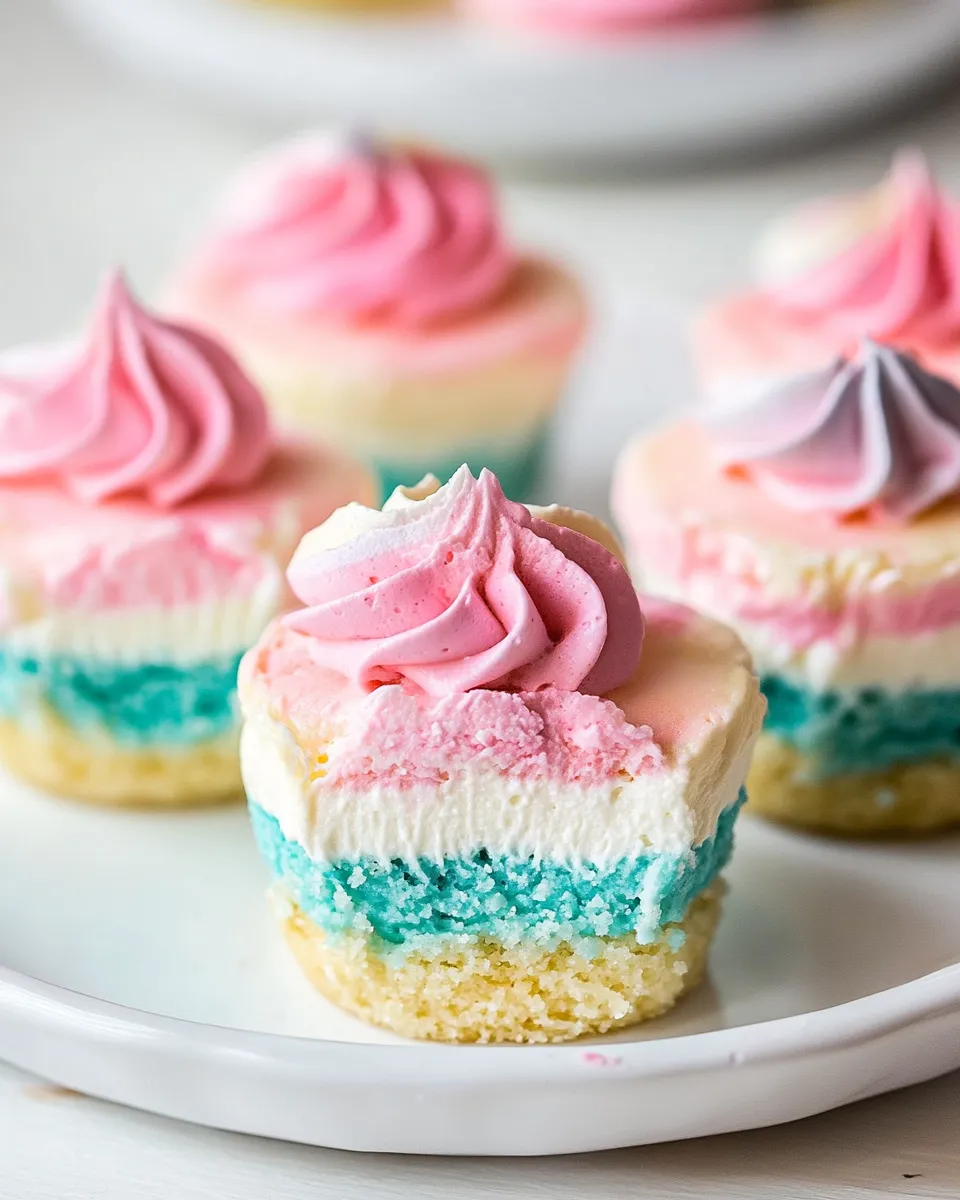
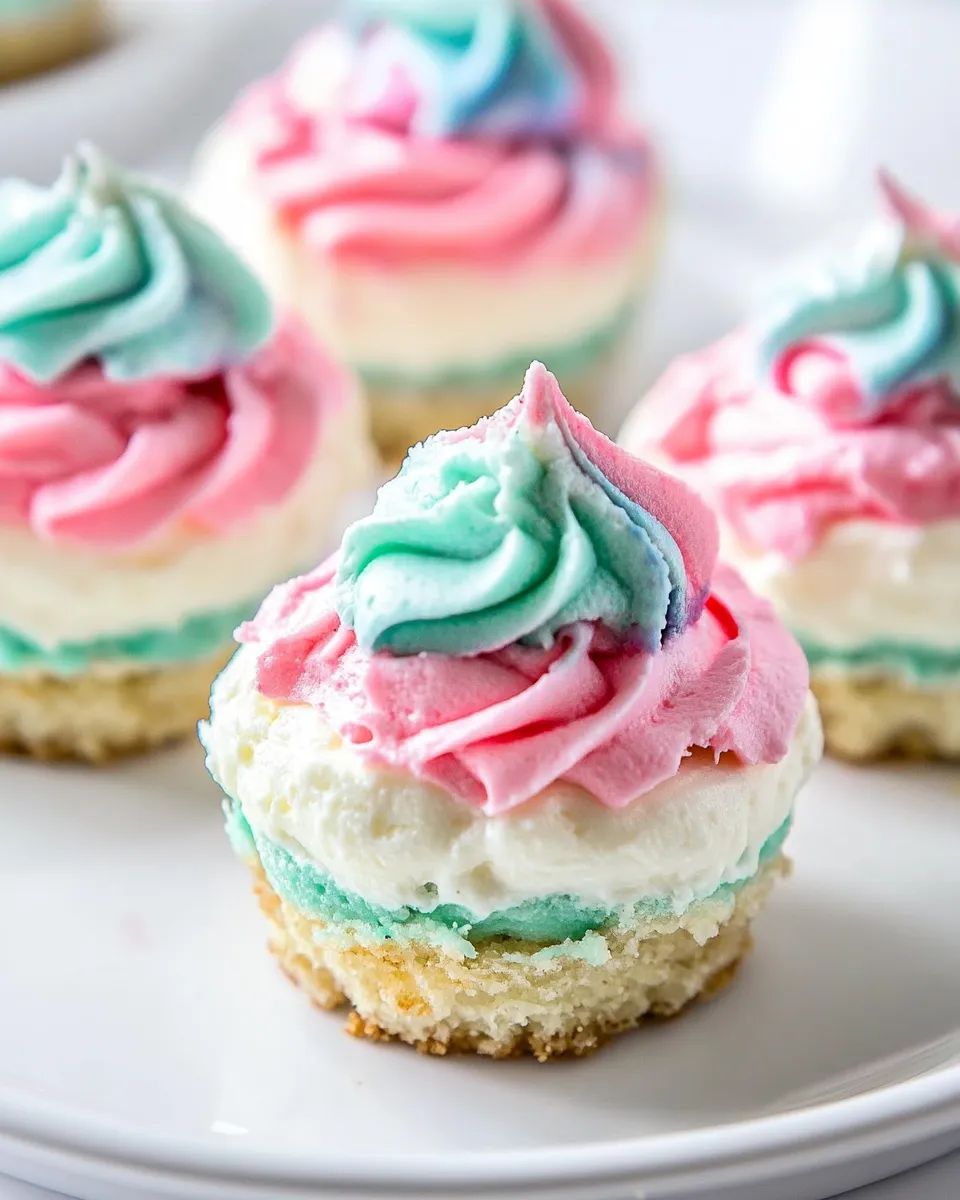
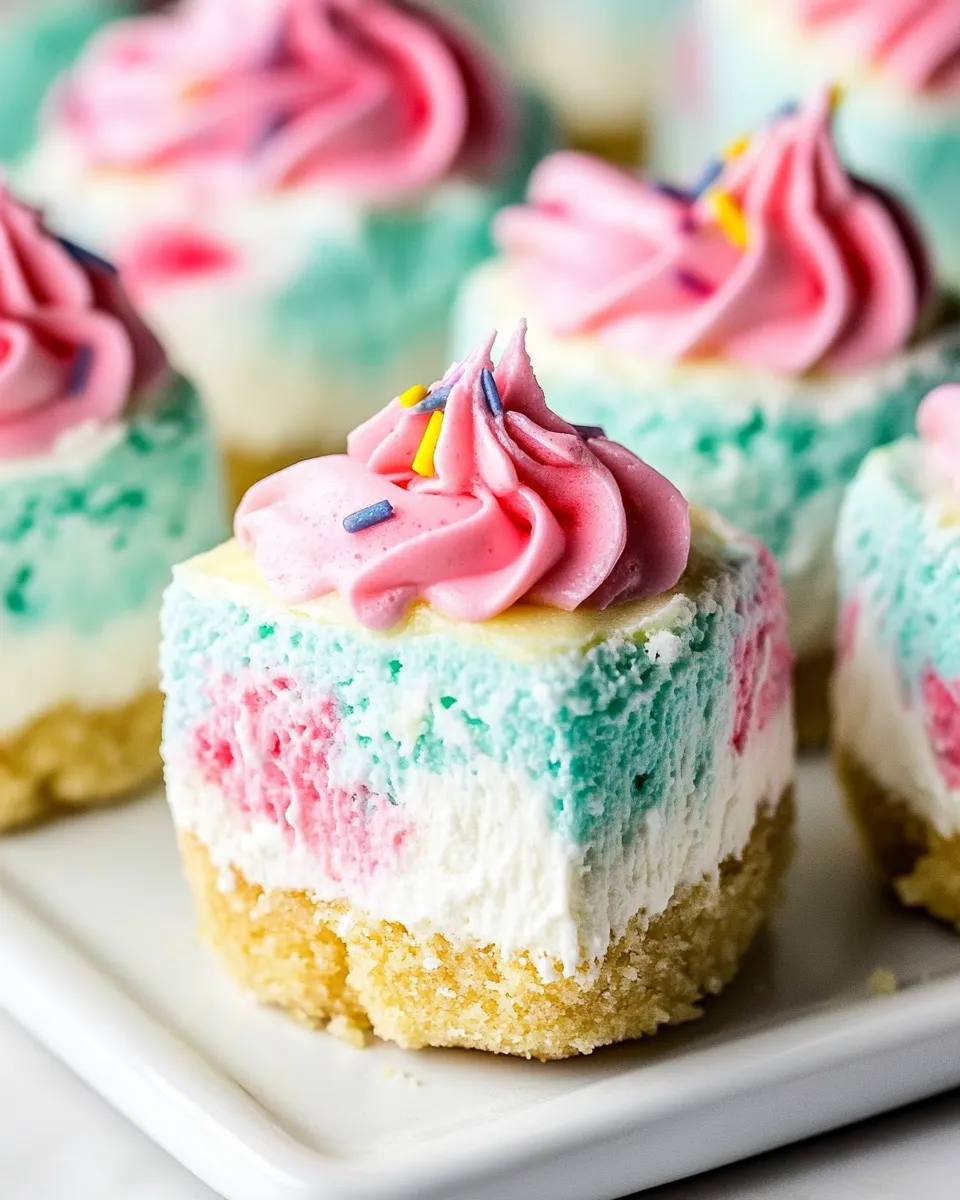
Small-batch No-bake Unicorn Cheesecakes
Unicorn-themed desserts are all the rage, and it’s no wonder why! These colorful, whimsical creations bring joy and excitement to any occasion. Today, I am thrilled to share my favorite recipe for Small-batch No-bake Unicorn Cheesecakes. This delightful treat is not only easy to make but also visually stunning. With a rich cream cheese filling, a buttery graham cracker crust, and a rainbow of colors, these cheesecakes will be the star of your dessert table. Let’s dive into this enchanting recipe!
Why This Recipe is a Keeper
If you’re searching for a dessert that’s perfect for any celebration, these Small-batch No-bake Unicorn Cheesecakes are a fantastic choice. Here’s why you’ll love them:
– **Quick and Easy**: With a simple method and minimal preparation time, these cheesecakes can be whipped up in no time.
– **No Baking Required**: The no-bake aspect means you can enjoy a delicious cheesecake without turning on the oven, making it perfect for warm weather.
– **Customizable**: Feel free to play with colors and toppings to match your theme or personal taste.
– **Perfect Portion Size**: This recipe yields just a few servings, making it ideal for small gatherings or when you want a sweet treat without the leftovers.
What’s in the Bowl
Gather your ingredients, and let’s get started! You’ll need the following:
- 1/2 cup graham cracker crumbs (about 3 full graham cracker sheets, crushed)
- 1 heaping tablespoon (16g) brown sugar
- 3 tablespoons (1.5oz) butter, melted
- 1/4 cup heavy cream
- 5 ounces cream cheese, softened
- 3 heaping tablespoons (42g) granulated sugar
- 1/2 teaspoon vanilla extract
- Blue food coloring
- Red food coloring
- Whipped cream (for topping)
- Sprinkles (for decoration)
Kitchen Gear Checklist
Before you begin, make sure you have the following tools at hand:
- Handheld electric mixer: This will make mixing your filling a breeze.
- Foil cupcake liners: Use these to shape your cheesecakes perfectly.
- Mixing bowls: You’ll need a couple for mixing your crust and filling.
- Measuring cups and spoons: Precision is key in baking!
- Spatula: For folding in the whipped cream and scraping down the sides of your bowls.
Make Small-batch No-bake Unicorn Cheesecakes: A Simple Method
Ready to create your own magical cheesecakes? Follow these easy steps:
Step 1: Prepare the Crust
In a mixing bowl, combine the graham cracker crumbs, brown sugar, and melted butter. Stir until the mixture resembles wet sand.
Step 2: Assemble the Cupcake Liners
Line a muffin tin with foil cupcake liners. Spoon the graham cracker mixture evenly into the bottom of each liner, pressing it down firmly to create a solid crust. Set aside.
Step 3: Whip the Cream
In another bowl, use your handheld electric mixer to whip the heavy cream until soft peaks form. This will give your cheesecake a light and airy texture.
Step 4: Make the Cheesecake Filling
In a separate bowl, beat the softened cream cheese, granulated sugar, and vanilla extract with your mixer until smooth and creamy.
Step 5: Fold in the Whipped Cream
Gently fold the whipped cream into the cream cheese mixture until well combined. Be careful not to deflate the whipped cream.
Step 6: Color the Cheesecake
Divide the cheesecake mixture into two bowls. In one bowl, add a few drops of blue food coloring and mix until you achieve your desired shade. In the other bowl, add a few drops of red food coloring and mix to create a pink hue.
Step 7: Layer the Cheesecake
Using a spoon or piping bag, layer the blue and pink cheesecake mixtures into the prepared crusts, alternating colors to create a beautiful marbled effect.
Step 8: Chill and Set
Place the cheesecakes in the refrigerator for at least 4 hours, or until firm. This step is crucial for achieving the perfect texture.
Step 9: Serve with Toppings
Once set, remove the cheesecakes from the refrigerator. Top each with a dollop of whipped cream and a sprinkle of colorful sprinkles for that extra festive touch.
Adaptations for Special Diets
If you have specific dietary needs, you can easily adapt this recipe:
- Gluten-Free: Use gluten-free graham crackers or an alternative crust made from crushed nuts or gluten-free cookies.
- Dairy-Free: Substitute cream cheese with a dairy-free cream cheese alternative and use coconut cream in place of heavy cream.
- Lower Sugar: Reduce the amount of sugar or use natural sweeteners like maple syrup or agave syrup.
Things That Go Wrong
Even the best bakers can run into a few hiccups! Here’s how to avoid common issues:
- Runny Cheesecake: Ensure your cream cheese is fully softened and mix until smooth. Make sure to properly whip the cream until soft peaks form.
- Crust Falling Apart: Press the graham cracker crust firmly into the cupcake liners to ensure it holds together.
- Too Sweet: Taste your cheesecake mixture before you assemble it. If it’s too sweet for your liking, adjust the sugar to taste.
Leftovers & Meal Prep
These Small-batch No-bake Unicorn Cheesecakes are best enjoyed fresh, but if you have leftovers, here’s how to store them:
Keep any uneaten cheesecakes in the refrigerator in an airtight container for up to 3 days. If you want to prepare them in advance, you can make the cheesecake filling and crust ahead of time, then assemble and chill just before serving.
Quick Questions
Can I freeze these cheesecakes?
Yes! You can freeze the cheesecakes for up to a month. Just make sure to wrap them well in plastic wrap and store them in an airtight container. Thaw in the refrigerator before serving.
Can I use different colors for the cheesecake?
Absolutely! Feel free to use any food coloring you love. You could even create a rainbow effect with multiple colors for a more vibrant dessert.
How can I make these cheesecakes more festive?
Consider adding themed decorations like edible glitter, themed candles, or using cookie cutters to shape the whipped cream on top.
What can I serve with these cheesecakes?
These cheesecakes pair beautifully with fresh fruit, chocolate sauce, or additional whipped cream for an indulgent treat.
Bring It to the Table
Now that you have mastered the art of making Small-batch No-bake Unicorn Cheesecakes, it’s time to share your creation! Whether you’re celebrating a birthday, hosting a tea party, or simply indulging in a sweet treat, these colorful cheesecakes will surely impress. The delightful layers and whimsical presentation will make your guests smile and create lasting memories.
So, gather your ingredients, don your apron, and let the magic of these Small-batch No-bake Unicorn Cheesecakes brighten your day. Enjoy the process, and don’t forget to snap a picture before they disappear! Happy baking!

Small-batch No-bake Unicorn Cheesecakes
Ingredients
Equipment
Method
- Step 1: Prepare the Crust - In a mixing bowl, combine the graham cracker crumbs, brown sugar, and melted butter. Stir until the mixture resembles wet sand.
- Step 2: Assemble the Cupcake Liners - Line a muffin tin with foil cupcake liners. Spoon the graham cracker mixture evenly into the bottom of each liner, pressing it down firmly to create a solid crust. Set aside.
- Step 3: Whip the Cream - In another bowl, use your handheld electric mixer to whip the heavy cream until soft peaks form. This will give your cheesecake a light and airy texture.
- Step 4: Make the Cheesecake Filling - In a separate bowl, beat the softened cream cheese, granulated sugar, and vanilla extract with your mixer until smooth and creamy.
- Step 5: Fold in the Whipped Cream - Gently fold the whipped cream into the cream cheese mixture until well combined. Be careful not to deflate the whipped cream.
- Step 6: Color the Cheesecake - Divide the cheesecake mixture into two bowls. In one bowl, add a few drops of blue food coloring and mix until you achieve your desired shade. In the other bowl, add a few drops of red food coloring and mix to create a pink hue.
- Step 7: Layer the Cheesecake - Using a spoon or piping bag, layer the blue and pink cheesecake mixtures into the prepared crusts, alternating colors to create a beautiful marbled effect.
- Step 8: Chill and Set - Place the cheesecakes in the refrigerator for at least 4 hours, or until firm. This step is crucial for achieving the perfect texture.
- Step 9: Serve with Toppings - Once set, remove the cheesecakes from the refrigerator. Top each with a dollop of whipped cream and a sprinkle of colorful sprinkles for that extra festive touch.
Notes
- These cheesecakes are best enjoyed fresh, but can be stored in the refrigerator for up to 3 days.
- Feel free to use any food coloring you love to customize the look.
- For a gluten-free version, substitute with gluten-free graham crackers.