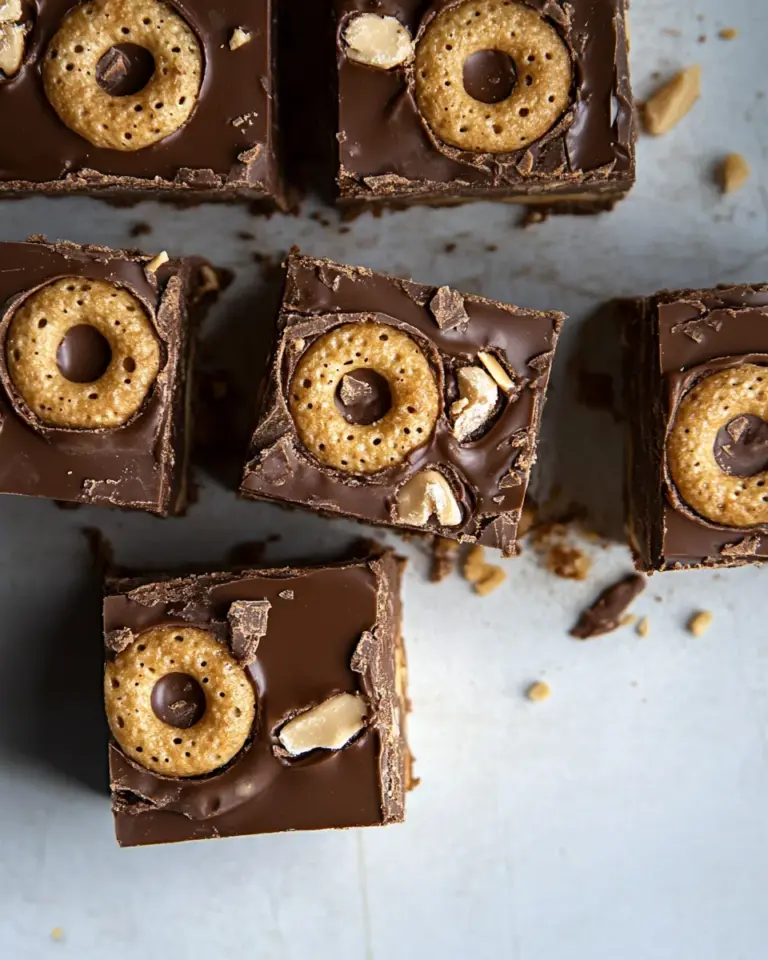
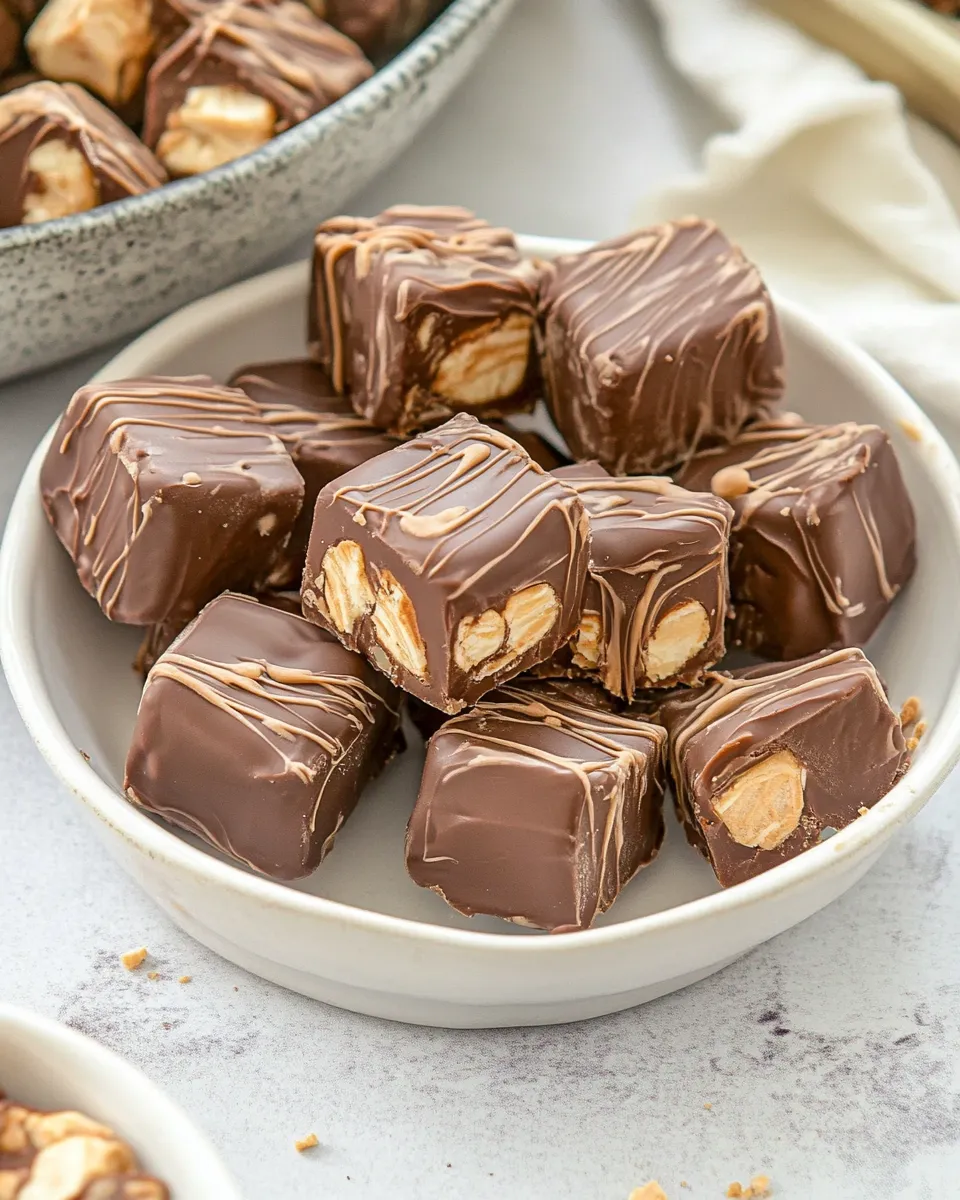
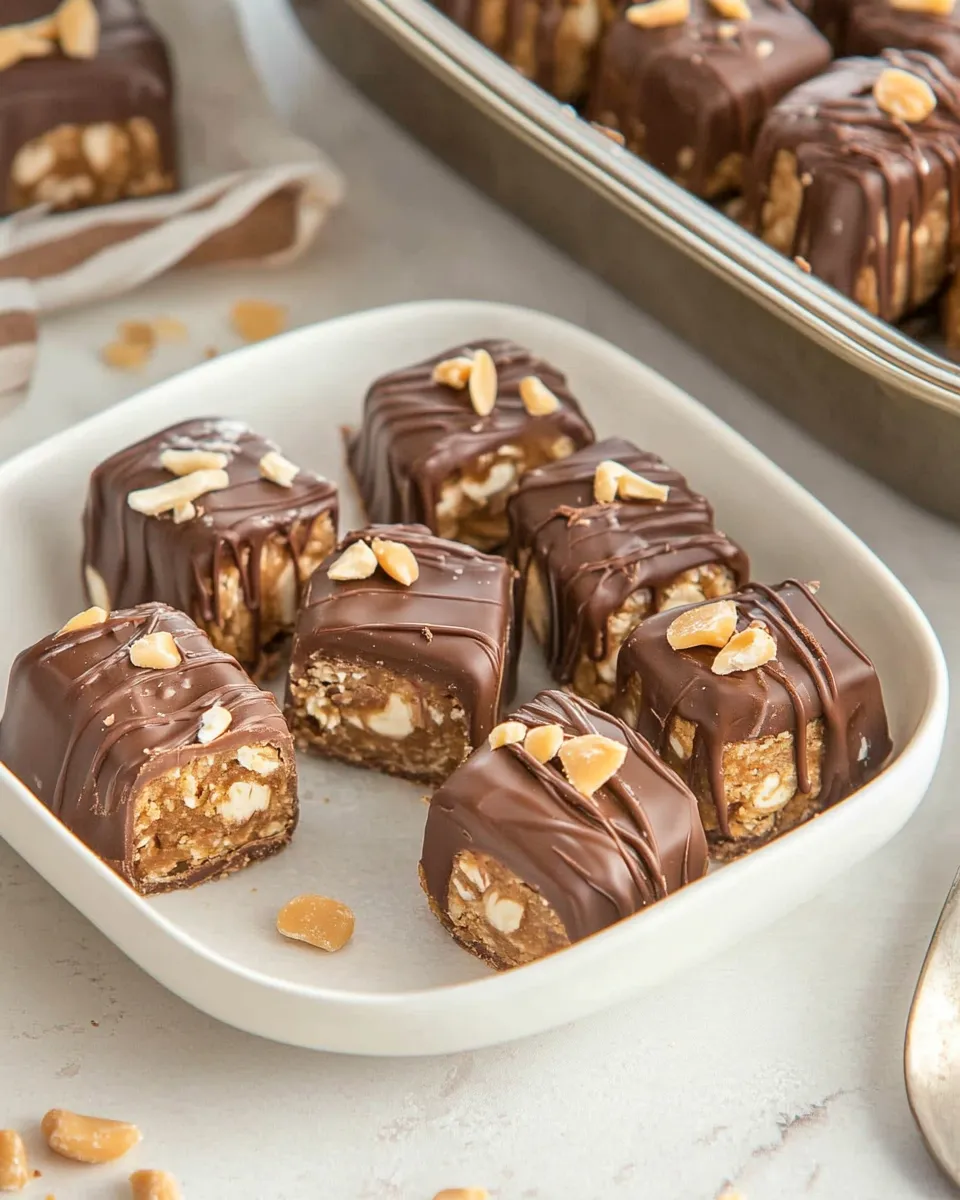
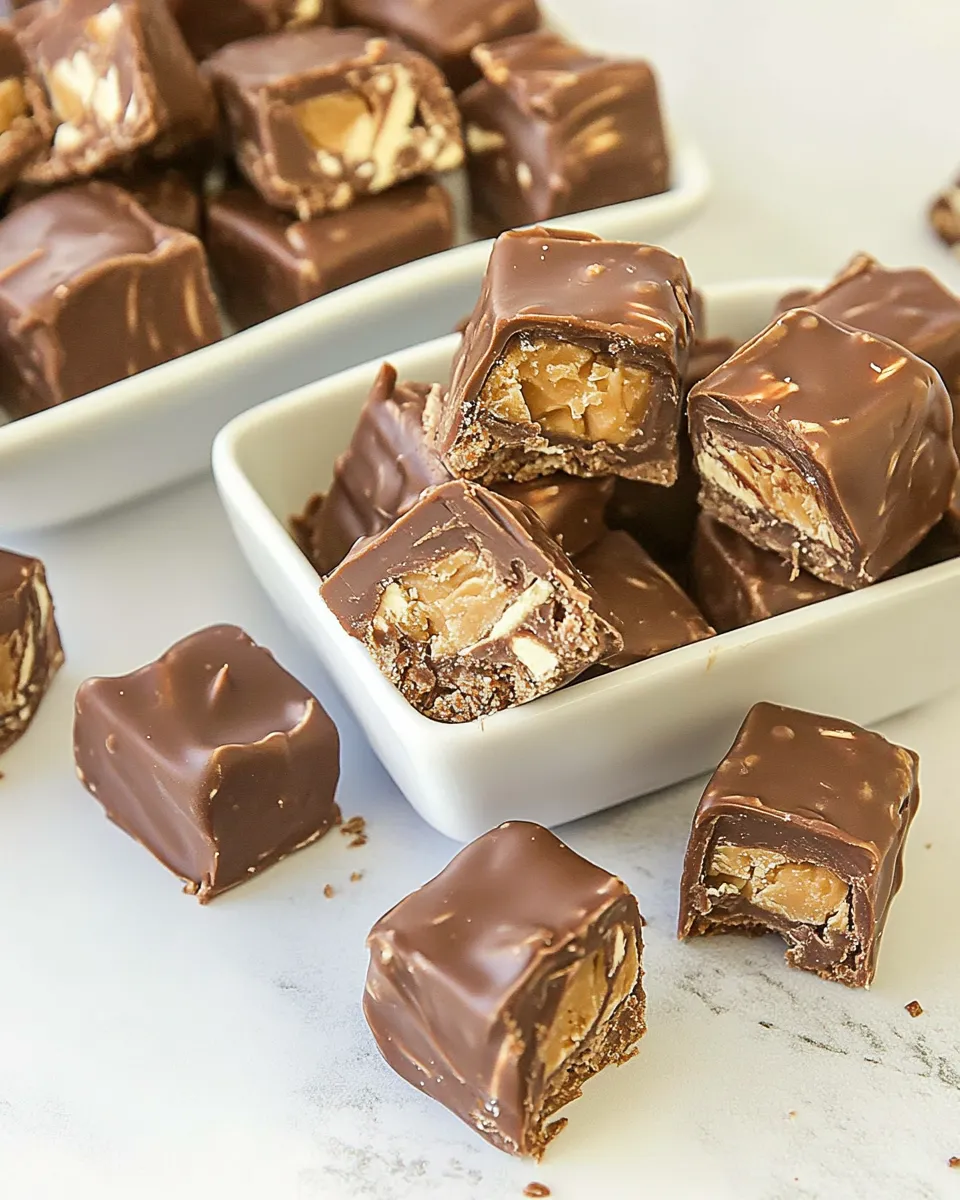
Snickers Bites
If you’ve ever craved the classic combination of chocolate, caramel, and peanuts, then Snickers Bites are the perfect treat for you. These bite-sized delights pack all the deliciousness of a full-sized Snickers bar into manageable pieces that are perfect for sharing—or not! Whether you’re hosting a party or simply indulging your sweet tooth, these Snickers Bites are sure to impress. Easy to make and utterly irresistible, let’s dive into the world of these chocolatey, nutty, and caramel-filled wonders.
Why Snickers Bites is Worth Your Time
Why put in the effort to create Snickers Bites at home? For starters, they are incredibly satisfying to make, allowing you to customize every layer to your liking. The combination of creamy peanut butter, sweetened condensed milk, and crunchy salted peanuts creates a texture that is nothing short of heavenly. Plus, making your own treats means you can control the ingredients, ensuring freshness and quality. Once you make a batch, you’ll find these bites disappearing faster than you can say “Snickers!”
Gather These Ingredients
To create your Snickers Bites, you’ll need to gather the following ingredients:
- 1 cup creamy peanut butter – This will form the delicious base for your bites.
- 14 ounces sweetened condensed milk (1 can) – Adds sweetness and helps bind everything together.
- 1 tablespoon unsalted butter – For added richness and creaminess.
- 1 cup salted peanuts (roughly chopped) – Provides that essential crunch and savory flavor.
- 1 teaspoon vanilla extract – Enhances the overall flavor of the mixture.
- 1 cup milk chocolate chips – For that classic chocolate coating.
- 1-2 teaspoons vegetable oil – Helps melt the chocolate smoothly.
- ½ cup caramel sauce (store-bought, warmed slightly for easier drizzling) – Drizzle it on top for a beautiful finish.
Recommended Tools
Before you start, make sure you have these essential tools handy:
- Mixing bowl – For combining all your ingredients.
- Spatula – To mix and transfer your mixture with ease.
- Baking pan (8×8 inches works well) – Where the Snickers Bites will set.
- Wax paper or parchment paper – For easy removal of the bites from the pan.
- Double boiler or microwave-safe bowl – For melting the chocolate.
Directions: Snickers Bites

Follow these simple steps to create your very own Snickers Bites:
Step 1: Prepare Your Pan
Line an 8×8 inch baking pan with wax or parchment paper, leaving some overhang to make removing the bites easier later on.
Step 2: Make the Peanut Butter Mixture
In a mixing bowl, combine the creamy peanut butter, sweetened condensed milk, unsalted butter, chopped salted peanuts, and vanilla extract. Stir well until all the ingredients are thoroughly mixed and smooth.
Step 3: Spread the Mixture
Pour the peanut butter mixture into the prepared baking pan. Use a spatula to spread it evenly across the bottom. Make sure it’s nicely flattened down.
Step 4: Chill the Base
Place the pan in the refrigerator for about 30 minutes, allowing the mixture to firm up.
Step 5: Melt the Chocolate
In a double boiler or microwave-safe bowl, melt the milk chocolate chips along with the vegetable oil. If using a microwave, heat in 30-second intervals, stirring in between until smooth.
Step 6: Coat the Peanut Butter Base
Once the peanut butter mixture has chilled and is firm, remove it from the refrigerator. Pour the melted chocolate over the top, spreading it evenly to cover all the edges.
Step 7: Drizzle with Caramel
While the chocolate is still warm, drizzle the slightly warmed caramel sauce over the top for that perfect finishing touch.
Step 8: Chill Again
Return the pan to the refrigerator for at least 1 hour, or until the chocolate has completely set.
Step 9: Cut and Serve
Once set, use the overhanging wax or parchment paper to lift the Snickers Bites out of the pan. Cut into bite-sized squares or rectangles. Serve and enjoy!
Nutrition-Minded Tweaks
If you’re looking to make some healthier adjustments, consider the following options:
- Use natural peanut butter without added sugar or oils for a healthier base.
- Substitute the sweetened condensed milk with a sugar-free version or a homemade alternative.
- Try dark chocolate chips instead of milk chocolate for a richer flavor and lower sugar content.
- Incorporate unsweetened cocoa powder into the peanut butter mixture for an extra chocolate kick.
Easy-to-Miss Gotchas
While making Snickers Bites, be mindful of these common pitfalls:
- Make sure the peanut butter is smooth and creamy to ensure a well-blended mixture.
- Don’t skip the chilling step; it’s crucial for achieving the right texture.
- When melting chocolate, be careful not to overheat it to avoid a grainy texture.
- Allow the caramel to warm slightly before drizzling for an easier application.
Prep Ahead & Store
Snickers Bites can be prepped ahead of time and stored for later enjoyment:
- Store in an airtight container in the refrigerator for up to a week.
- For longer storage, freeze individually wrapped bites for up to three months.
- Let frozen bites thaw in the refrigerator before indulging for the best texture.
Your Questions, Answered
Can I use crunchy peanut butter instead of creamy?
Absolutely! Crunchy peanut butter will add an extra layer of texture to your Snickers Bites, making them even more delightful.
What can I substitute for salted peanuts?
If you prefer, you can use unsalted peanuts or even try almonds or cashews for a different flavor profile.
Is it possible to make these bites vegan?
Yes! You can substitute the sweetened condensed milk with a vegan alternative, use dairy-free chocolate chips, and ensure the caramel sauce is vegan-friendly.
How do I know when the chocolate is set?
The chocolate should appear firm and glossy. A gentle touch should not leave any chocolate residue on your finger, indicating it’s ready to be cut and enjoyed.
Final Thoughts
Making your very own Snickers Bites is not only a fun kitchen project but also a delightful way to satisfy your sweet cravings. With layers of creamy peanut butter, crunchy peanuts, luscious caramel, and rich chocolate, each bite is a little piece of heaven. Perfect for parties or just a quiet night in, these treats are sure to become a favorite in your home. So gather your ingredients, follow the steps, and enjoy the sweet satisfaction of homemade Snickers Bites!
Snickers Bites
Ingredients
Equipment
Method
- Step 1: Prepare Your Pan
Line an 8x8 inch baking pan with wax or parchment paper, leaving some overhang to make removing the bites easier later on. - Step 2: Make the Peanut Butter Mixture
In a mixing bowl, combine the creamy peanut butter, sweetened condensed milk, unsalted butter, chopped salted peanuts, and vanilla extract. Stir well until all the ingredients are thoroughly mixed and smooth. - Step 3: Spread the Mixture
Pour the peanut butter mixture into the prepared baking pan. Use a spatula to spread it evenly across the bottom. Make sure it’s nicely flattened down. - Step 4: Chill the Base
Place the pan in the refrigerator for about 30 minutes, allowing the mixture to firm up. - Step 5: Melt the Chocolate
In a double boiler or microwave-safe bowl, melt the milk chocolate chips along with the vegetable oil. If using a microwave, heat in 30-second intervals, stirring in between until smooth. - Step 6: Coat the Peanut Butter Base
Once the peanut butter mixture has chilled and is firm, remove it from the refrigerator. Pour the melted chocolate over the top, spreading it evenly to cover all the edges. - Step 7: Drizzle with Caramel
While the chocolate is still warm, drizzle the slightly warmed caramel sauce over the top for that perfect finishing touch. - Step 8: Chill Again
Return the pan to the refrigerator for at least 1 hour, or until the chocolate has completely set. - Step 9: Cut and Serve
Once set, use the overhanging wax or parchment paper to lift the Snickers Bites out of the pan. Cut into bite-sized squares or rectangles. Serve and enjoy!
Notes
- Store in an airtight container in the refrigerator for up to a week.
- For longer storage, freeze individually wrapped bites for up to three months.
- Let frozen bites thaw in the refrigerator before indulging for the best texture.