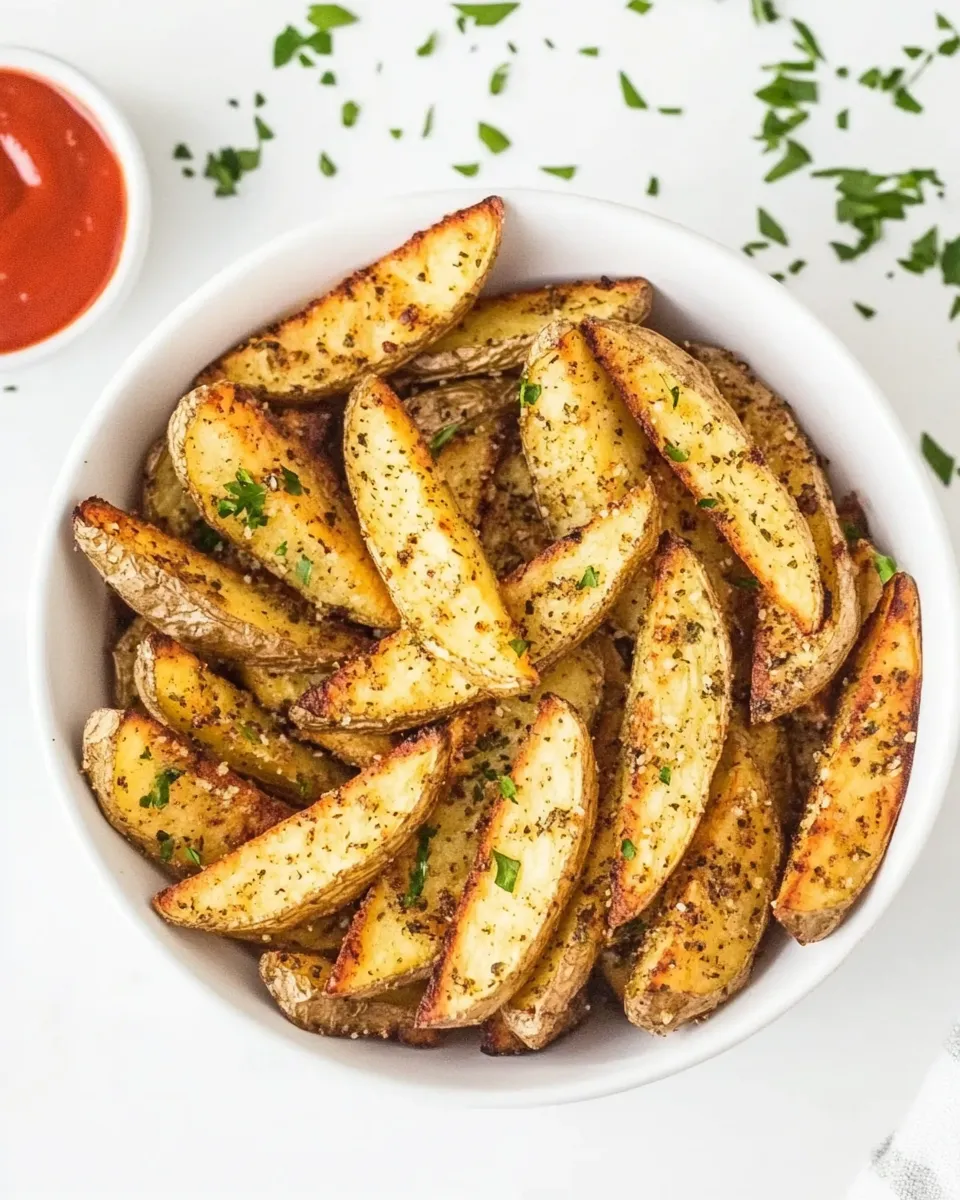
Crispy Baked Oven Fries
There’s something undeniably comforting about a plate of crispy baked oven fries. Golden-brown, perfectly seasoned, and bursting with flavor, they can elevate any meal or stand alone as a satisfying snack. The best part? You can whip these up in your kitchen without the hassle of deep-frying. Using just a handful of ingredients, you’ll create a dish that’s sure to impress everyone at the table. Grab your potatoes, and let’s get started on this delightful journey to crispy perfection!
Why It’s Crowd-Pleasing

Crispy baked oven fries are not just a side dish; they’re an experience. Whether you’re serving them alongside a juicy burger, a fresh salad, or simply enjoying them on their own, these fries are versatile enough to please even the pickiest of eaters. The secret lies in the combination of seasonings and the way they’re cooked—resulting in an irresistible crunch that will have everyone reaching for more. Plus, they’re a healthier alternative to traditional fries, making them a guilt-free indulgence!
Ingredient Checklist
To create your very own crispy baked oven fries, gather the following ingredients:
- 4 medium russet potatoes, cut into 8-12 wedges each
- Cooking spray, for a light coating
- 1 tablespoon canola oil or avocado oil
- 2 teaspoons garlic powder
- 2 teaspoons onion powder
- 1 teaspoon paprika
- 1 teaspoon sea salt or kosher salt
- ½ teaspoon pepper
Before You Start: Equipment
Before diving into the cooking process, make sure you have the following equipment on hand:
- Baking sheet: A large, flat surface for baking your fries.
- Parchment paper: Optional, but recommended for easy cleanup and to prevent sticking.
- Mixing bowl: For tossing the potatoes with oil and seasonings.
- Knife and cutting board: To cut your potatoes into wedges.
- Measuring spoons: For accurate measurements of your seasonings.
Crispy Baked Oven Fries: Step-by-Step Guide

Creating crispy baked oven fries is a straightforward process. Follow these simple steps to achieve fry perfection:
Step 1: Preheat Your Oven
Start by preheating your oven to 425°F (220°C). This high temperature is crucial for creating that delightful crispiness.
Step 2: Prepare the Potatoes
Wash and scrub your russet potatoes thoroughly. There’s no need to peel them; the skin adds extra texture and flavor. Cut each potato into 8-12 wedges, depending on your preferred thickness.
Step 3: Soak the Wedges
For extra crispy fries, soak the potato wedges in cold water for at least 30 minutes. This helps remove excess starch, allowing for a crunchier texture.
Step 4: Dry the Potatoes
After soaking, drain the wedges and pat them dry with a clean kitchen towel. Removing moisture is key to achieving that crispiness.
Step 5: Season the Wedges
In a mixing bowl, combine the dried potato wedges with canola or avocado oil, garlic powder, onion powder, paprika, sea salt, and pepper. Toss until every wedge is evenly coated.
Step 6: Arrange on a Baking Sheet
Line your baking sheet with parchment paper for easy cleanup. Spread the potato wedges out in a single layer, making sure they aren’t overcrowded. This allows heat to circulate, promoting crispiness.
Step 7: Bake to Perfection
Bake the fries in the preheated oven for about 30-35 minutes. Halfway through the cooking time, flip the fries to ensure even browning. Keep an eye on them during the last few minutes to prevent burning.
Step 8: Serve and Enjoy
Once your fries are golden and crispy, remove them from the oven and let them cool for a minute. Serve immediately, garnished with fresh herbs or additional seasoning, if desired. Enjoy your crispy baked oven fries with your favorite dipping sauce!
Make It Year-Round

Crispy baked oven fries are incredibly versatile, making them a perfect dish for any season. Here are a few ways to enjoy them throughout the year:
- Summer BBQs: Serve alongside grilled meats and fresh salads.
- Fall Gatherings: Pair with hearty soups and stews for a comforting meal.
- Winter Warm-Ups: Enjoy with hot dips or as a side to cozy casseroles.
- Spring Picnics: Pack them for a delightful snack in the great outdoors.
Chef’s Rationale
Many people shy away from making fries at home, thinking it requires deep-frying and a mess to clean up. However, crispy baked oven fries not only save you the hassle but also provide a healthier alternative without sacrificing flavor. The combination of garlic powder, onion powder, and paprika adds a depth of flavor that elevates these simple potatoes to a star dish. By using high heat and the right cooking method, you achieve that coveted crunch while keeping the insides fluffy and tender.
How to Store & Reheat
If you find yourself with leftover crispy baked oven fries, don’t fret! Here’s how to store and reheat them for maximum enjoyment:
- Storage: Place cooled fries in an airtight container in the refrigerator. They can be stored for up to 3 days.
- Reheating: For the best results, reheat fries in the oven at 400°F (200°C) for about 10 minutes, or until heated through and crispy again. Avoid using the microwave, as it can make them soggy.
Your Top Questions
Can I use different types of potatoes?
Absolutely! While russet potatoes are ideal for their starchy texture, you can experiment with Yukon gold or sweet potatoes for a different flavor and texture. Just be mindful of cooking times as they may vary.
Are these fries gluten-free?
Yes, crispy baked oven fries are naturally gluten-free, making them a great option for those with gluten sensitivities or celiac disease. Just ensure that any additional condiments or dips you serve are also gluten-free.
Can I add different seasonings?
Definitely! Feel free to get creative with your seasonings. Try adding chili powder for a kick, or Italian herbs for a Mediterranean twist. The possibilities are endless!
How do I make them extra spicy?
If you enjoy a bit of heat, consider adding cayenne pepper or red pepper flakes to the seasoning mix. Start with a small amount and adjust to your spice preference!
Wrap-Up
Crispy baked oven fries are more than just a side dish; they’re a culinary delight that brings joy to every meal. With their charming crunch and savory flavor, they make an excellent addition to any dinner plate or a satisfying snack on their own. Plus, they’re simple to prepare, requiring just a few ingredients you likely already have in your pantry. As you experiment with different seasonings and pairings, you’ll find that these fries can easily become a staple in your cooking repertoire.
So, gather your ingredients, preheat that oven, and get ready to enjoy a plate of crispy baked oven fries that will make you feel like a kitchen pro. Happy cooking!
Crispy Baked Oven Fries
Ingredients
Equipment
Method
- Step 1: Preheat Your Oven. Start by preheating your oven to 425°F (220°C). This high temperature is crucial for creating that delightful crispiness.
- Step 2: Prepare the Potatoes. Wash and scrub your russet potatoes thoroughly. There’s no need to peel them; the skin adds extra texture and flavor. Cut each potato into 8-12 wedges, depending on your preferred thickness.
- Step 3: Soak the Wedges. For extra crispy fries, soak the potato wedges in cold water for at least 30 minutes. This helps remove excess starch, allowing for a crunchier texture.
- Step 4: Dry the Potatoes. After soaking, drain the wedges and pat them dry with a clean kitchen towel. Removing moisture is key to achieving that crispiness.
- Step 5: Season the Wedges. In a mixing bowl, combine the dried potato wedges with canola or avocado oil, garlic powder, onion powder, paprika, sea salt, and pepper. Toss until every wedge is evenly coated.
- Step 6: Arrange on a Baking Sheet. Line your baking sheet with parchment paper for easy cleanup. Spread the potato wedges out in a single layer, making sure they aren’t overcrowded. This allows heat to circulate, promoting crispiness.
- Step 7: Bake to Perfection. Bake the fries in the preheated oven for about 30-35 minutes. Halfway through the cooking time, flip the fries to ensure even browning. Keep an eye on them during the last few minutes to prevent burning.
- Step 8: Serve and Enjoy. Once your fries are golden and crispy, remove them from the oven and let them cool for a minute. Serve immediately, garnished with fresh herbs or additional seasoning, if desired.
Notes
- For extra flavor, experiment with different seasoning blends.
- Store leftovers in an airtight container in the refrigerator for up to 3 days.
- Reheat in the oven for best results, avoiding the microwave to maintain crispiness.